NOVEMBER 3 VICTOR ECHO MIKE
  • Blog
  • Events and Activations
  • Diversions
  • About
  • Gallery
  • Contact
  • Links
  • Subscribe
  • Search
  • Blog
  • Events and Activations
  • Diversions
  • About
  • Gallery
  • Contact
  • Links
  • Subscribe
  • Search
NOVEMBER 3 VICTOR ECHO MIKE

ham radio Projects and musings from a (Relatively) new operator

Give Me Liberty

6/6/2017

0 Comments


WWFF Activation Report!

I haven't been out to do any portable operations for some time, primarily because I haven't had to do any work trips for a while. For me, the two things usually coincide.  I just had another work trip to do that took me to our New York City office, which meant I also had the opportunity to do another activation!  I'll warn you now - this post gets a touch sentimental at the end, but ham radio does that to me...
Picture
Picture

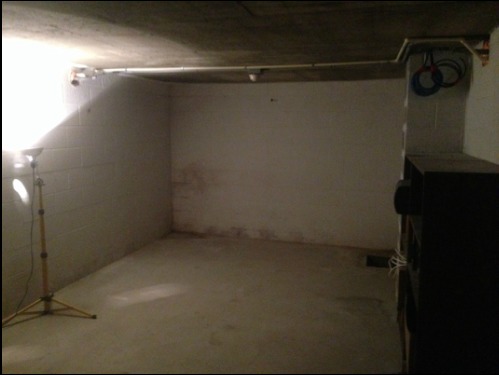
Liberty State Park KFF-1623

Picture
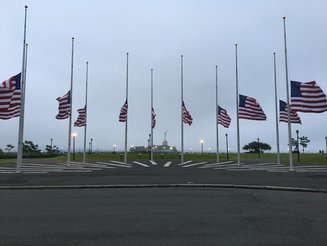
View from Liberty State Park, a couple days after the attacks in London.

​I used my normal bag of tricks when deciding which park to activate on this trip.  I've written in the past about my methodology for choosing a park to activate, so if you're into that kind of thing you can read about it here.  For some of my recent activations I have stayed inside of state parks, but for this trip I was staying at one of the standard chain hotels and driving in and out of the park in the evenings.
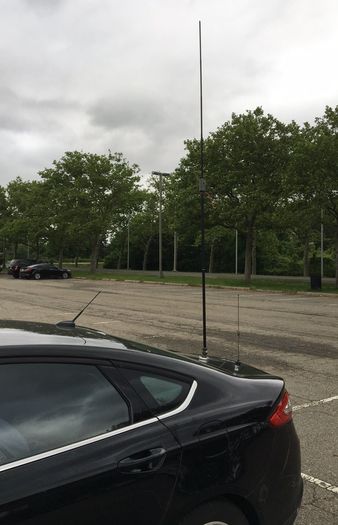
Since I wasn't going to be able to do one of my preferred portable setups, I did a little fiddling with my antennas.  I wanted to use something a little more than just the hamsticks that I use while mobile, but I was going to be limited with what I could do because of time and space constraints associated with driving in and out of the park.  The solution I ended up going with was to use parts of my Buddipole as a vertical antenna, in the ball mount on my car.  I've touched on this before when I wrote about how I love the standards (specifically, the fact that most of our antenna bits use 3/8-24 connectors!)  This time, I kept notes when I was fiddling around, in case someone wants to replicate it:
Picture
20 Meters:  2 antenna arms, 1 coil, tapped 13 windings down, and 1 of the standard telescoping whip sections (extended just short of 5 full sections)
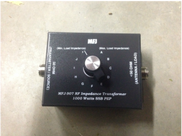
40 Meters (voice portion of band): 2 antenna arms, 1 coil (not tapped), 1 of the standard telescoping whip sections (extended 4 sections), and 1 additional detail - verticals on cars at this frequency often need some assistance making a match.  In my case I have an MFJ-907 unun installed the car (I talked about that here.) I also needed use that on it's "J" setting to match the antenna to the feed-line.


Picture
So how did the activation go?  Awesome! The first evening I made 50 or so contacts, with a couple DX highlights: Portugal, and a Mobile in England.  
The second night I made a handful of additional contacts, but I also had an additional DX contact that deserves special attention - ON7NQ.  This was my very first DX contact on CW.  While that in itself is special, what really struck me when I made it back to my hotel for the evening was this:

For me this was awesome.  Not awesome they way we use it in every day language, but awesome in the sense of it's true definition - inspiring great admiration - because I feel like this contact represents the very heart of one of the purposes of ham radio, international goodwill.  Here's why:
   
​     I'm very new to CW.  I've only had my license since 2014, so I didn't have to learn code for my test, but I'm fascinated by it, and wanted to learn it.  I'm still a complete noob though, struggling through contacts at 5 wpm.  That's what makes this so fantastic.  It was obvious to me that Danny took his time, and slowed way down from what he was accustomed too, in order to make this contact with me.  He even worked through me sending the "?" character a couple times as I tried to work out his call.  After we finally made the contact he even followed up with encouraging words on FaceBook, which was just spectacular.  
Let's pause for a minute to reflect on this.  As a contrast, I was walking the streets of NYC earlier the same day, which is one of the most diverse places in the US.  Even in that diversity however, there isn't much goodwill happening.  People are in a hurry, they push, they shove, we crammed onto subway cars, and the friendliest thing I heard anyone say was "Get out of my way!"  With all the opportunity for interaction face to face, we often miss that chance.  But here, on ham radio, someone I don't know, from another culture, who probably speaks a language I don't know much of (Ich spreche ein bischen deutsch, aber es ist nicht so gut...) treated me with patience, kindness and encouragement.  Via ham radio, we are participating in international goodwill in a way that exceeds domestic goodwill.  I love that I participate in a hobby where this is an every day occurrence!  I can't say any more than that, so for now 73!
0 Comments

Operating Position

5/26/2017

2 Comments

 
Post Contains Affiliate Links
I have another update to share on the progress in my shack! The operating position received the treatment that will make up the "wall" behind the desk. My little helper wanted to demonstrate what it would look like when someone was sitting in the chair, so use your imagination and pretend she is sitting on a comfortable office chair, with a desktop/work surface around her, along with the dim glow from all the radio equipment:
Picture
Here are a couple more pictures, and then I'll describe my slightly unorthodox method to hang this, what I used, and what the plan is:
While this might not look like much at the moment, it actually represents something that I put a bit of forethought into. I like a clean look, so I knew that for my operating position, I wanted the equipment recessed into the wall, so that from the desk you would just see the faces of the equipment through purposefully sized cutouts. What you see here is actually 3/4 inch maple plywood, that will be stained, since that is in keeping with the look I'm after for the room.  The wood wall will give me the look I'm after, while giving me the ability to mount the equipment they way I want.
The framing that this plywood is on was framed with studs 24 inches on center instead of the standard 16 inches, so that there would be room for equipment to slide in between the studs. This also gives me plenty of space between studs to use some rack mount hardware, or potentially even put racks behind, with the faces flush with the wall. I have also mentioned previously, but now you can better see, that I framed the wall about 4 feet from the back of the room.  This gives me a utility space that I can walk into, which will give me access to the back of all the equipment, and a place to put the "non-glamorous" components, like back-up batteries, etc.
Picture

I hung these plywood panels in a non-traditional way. Since these panels will be stained, and will be the visible "wall", I didn't want to see screw heads.  To make this happen I borrowed a tool from my YL (I'm pretty sure I've used it more than she has...)

​For those that don't know, this thing is called a Kreg Jig. It lets you create perfect holes for pocket screws, which is a pretty slick way to hide fasteners. The most common application is probably for making the face frames for cabinetry, since they are an easy and fast way to join material that is butted together. In my case, when combined with some construction adhesive between the stud and plywood, it was a perfect way to screw my panels from the rear, while being sure that the tips of the screws wouldn't poke through the face!
Picture

The way the height works out, once I build the desktop, the desktop and splash guard will hide the seam between the top panel and the one below. The end result will be a seamless wall the I can mount equipment in, that is strong enough to hold anything that I might reasonably hang on it (TV / PC monitors) that gives me a finished look, while at the same time giving me very easy access to the rear of the equipment!
I'm pleased with how it's coming along! If you were doing a similar project, what features would you build in while you had the chance?
P.S.  I found a use for the cutoff ends of this plywood, to build something that my YL has wanted for a while, that has a bit of a ham radio tie-in.  I'll share that soon!
Previous: Shack Build
Next: Shack Build
Back to Part 1 of this Project
2 Comments

Details and the Important Stuff

5/22/2017

0 Comments

 
I think details are important. I prefer neatly wrapped cables. I like straight lines. I abhor piles, but if a stack is required, it MUST go from largest on the bottom to smallest at the top. I'm picky about how the dishwasher should be loaded (to the point where my family makes me do all the dishes...) Need I go on?
Now that you have some insight into my neurosis, I'll fill you in on why I shared. The empty concrete cube that I've been turning into my ham shack had some conduit and a decent size junction box for my home fire alarm system running through it (that's right - I said fire alarm system, not smoke detectors. I am fortunate enough to have a commercial fire alarm system in my house.) The junction box was too deep for the ceiling treatment I did, so after the main ceiling was up, I needed to build up a little something to cover it, and to mount the smoke sensor onto, so that my sense of order in the universe would not be shattered. Here's how I did it:
Picture
I started by cutting a piece of 3/4 inch pine to about 6x6 inches.
Picture
I next used my router to zip a nicer profile around the outside edge. I also marked the center to cut out, so it would fit around the junction box.
Picture
I cut out the center. I allowed this to be a rough cut, because it will be hidden.
Picture
Test fit around the box.
Picture
I cut a second board, slightly smaller than the first, and routed the same profile on it.
Picture
Some clamps and glue, and a hole for the wires to pass through (commercial fire alarm equipment is low voltage, so the wires are pretty small. If you were doing this for a standard 120volt Smoke Detector you'd need a bigger hole, and possibly a junction box extension)
Picture
A little bit of stain to match the rustic ceiling, 4 screws, and presto - a pedestal for the most important piece of equipment in the ham shack!

    That's That!  The most important piece of equipment in my ham shack is already in place and operating.  Hopefully though, I'll never need it! 
Previous: Shack Build
Next: Shack Build
Back to Part 1 of this Project
0 Comments

A Roof Over My Head

5/18/2017

2 Comments

 
Post contains affiliate links
If you go back in time a couple years, to the beginnings of my blog, you might recall that one of the reasons I started it was to share my ongoing shack builds. It's been a while, but as I promised last week, I finally have an update on the home shack.  This is a good time to also point out, that if you don't follow me on twitter or instagram, please Check out the links in the right side bar and do so!  My followers there got several sneak peaks at this while it was in progress...
The last time I shared, I only had framing done. Since then, the rough electrical for the non-radio stuff (outlets & lights) has been nearly finished. Because of low headroom, I decided to do exposed conduit for part of the main run to the shack's sub panel. This means I had to get the ceiling treatment done before I could finish my rough electrical.
The raw space I had to work with is actually underneath my house's original garage. The suspended concrete ceiling was hardly smooth (check out the picture!), so I wanted a treatment that wouldn't look strange if it was uneven or wavy. Ultimately, because (as I've mentioned before) I'm going for the "old English pub meets mad scientist lair" look, I decided that a wood plank ceiling would fit the bill.
Picture
Here's what the space looked like before this project started - raw concrete cube, and nearly none of it was straight / level / plumb!
Since I wanted something that looked old and weathered, I knew that I needed boards that were a little rough. They do make flooring that "looks" old, but it still seemed too modern.  To get the look I was after, I ended up buying 1/2" exterior sheating. This is plywood that has imperfections, knots, dings, you name it. In other words, with a bit of stain, it would be perfect!
Before I got too carried away, I put up furring strips and foam insulation board. I also painted the face of the insulation board gray, so that if there were any gaps in my rustic ceiling you wouldn't see green or pink foam showing through.
The next step was to fire up my table saw. I love this saw! It was an "every holiday this year" gift from the YL. I also have the stand that lets me roll it around the garage, so when I'm using it I can push it over to the 240v outlet on the center garage post, and then push it back to the side when I'm done. Anyway, I ripped the plywood down into 8" and 7" boards. I did this to keep the boards from looking too uniform, plus it creates less waste in in the amount of plywood used. Most of the ceiling is the 8" boards with couple rows of the 7" boards thrown in for effect.
With my fancy boards ready to go, I started the process that took a couple weeks worth of spare evenings. I would stain as many boards as I had room to lay out, and then the next available evening I would screw them up, and then stain the next round. Repeat until finished.
I'm thrilled with the way it came out! I know the look isn't for everyone, but I love it, and will enjoy it every time I lean back in operating chair for a stretch between contacts!
Previous: Shack Build
Next: Shack Build
Back to Part 1 of this Project
2 Comments

Not at Hamvention

5/16/2017

0 Comments

 
.     It feels like everyone is headed to Hamvention!  As much as I'd like to go, it just isn't in the cards in my current situation.  Basically, as a young father that travels for work, the vacation time I get is a carefully guarded commodity that is saved exclusively for spending time with my family.  Even thought I'm sure they'd go with me to Hamvention if I asked, I'd rather them enjoy themselves as well during our vacations - looking at radio stuff just doesn't do it for them the way it does for me!
     Just because I'm not there, doesn't mean I'm not doing radio!  I have several irons in the fire.  If you follow me on Twitter or Instagram (check out the links in the sidebar!) you saw the pictures of my progress on the shack.  It now has a ceiling, and a good portion of it's electrical:
Picture
     I'll get into details of how I made the ceiling, in another post specifically about the shack, but I'm please with how it turned out.  I'm going for the whole "Old English Pub meets Mad Scientist Lair" look for my shack, and I love the way this turned out!
     I also have another very tall "iron" (hint hint) in the fire but I don't want to get into that too much, because if it works out I don't want to jinx it - just do me a favor and put your good vibes out into the universe for me!
     Are you at Hamvention?  If so, what are you up to?  If you're not, what are doing to keep busy?  Leave a comment and let me know!

P.S.  The next round of info that I'll need input for on the Crowd-Sourced project will be coming soon!
0 Comments
<<Previous
Forward>>

    Categories

    All
    Antenna
    Cw
    Digital-modes
    Flying-with-gear
    Home QTH
    Miscellaneous
    Mobile
    Operating Events
    Portable
    POTA
    Shack Build
    Technical


    - N3VEM -

         Welcome to my Ham Radio Blog!  This blog was started primarily to share my two concurrent shack builds - my mobile station and my home station.  Over time, this has grown to include sharing about my operations, and general radio-related thoughts that I have as a newer operator.  
         
    ​Enjoy!

    RSS Feed


    Picture
    POTA!

    Picture
    Proving that hams do indeed still build stuff!

    Picture
    100 Watts and Wire is an awesome community, based around an excellent podcast. 

    Archives

    September 2020
    July 2020
    January 2020
    September 2019
    August 2019
    July 2019
    June 2019
    May 2019
    March 2019
    January 2019
    December 2018
    November 2018
    October 2018
    September 2018
    August 2018
    July 2018
    June 2018
    May 2018
    April 2018
    March 2018
    February 2018
    January 2018
    December 2017
    November 2017
    October 2017
    September 2017
    August 2017
    July 2017
    June 2017
    May 2017
    April 2017
    March 2017
    February 2017
    January 2017
    December 2016
    November 2016
    October 2016
    September 2016
    August 2016
    July 2016
    June 2016
    May 2016
    April 2016
    March 2016
    February 2016
    January 2016
    December 2015
    November 2015


Picture
Copyright © 2015
 Vance Martin is a participant in the Amazon Services LLC Associates Program, an affiliate advertising program designed to provide a means for sites to earn advertising fees by advertising and linking to amazon.com.