post contains affiliate links
I'm sure the purists are tired of hearing about my CB install at this point, so this will be my last post on it, but that's mainly because it's finally done! (Is any radio project every really done?)
I spent about an hour and a half between the last couple of evenings finishing up the install of a CB radio into the center console of my car. To come up to speed, you may want to check out part 1 and part 2 of this project. Okay - now that you're up to speed, all I really had left to do was to make the permanent mounting panel to replace the temporary wooden template that served for test-fitting purposes.
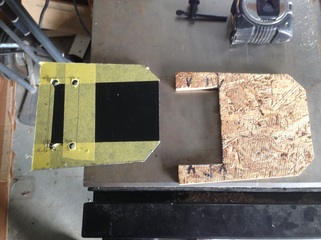
At this point, the process was fairly straight-forward. First, I put some tape onto the piece of HDPE that I had gotten from Tap Plastics to both protect it, but also so that I had something to mark on. I then traced the plywood template onto this, and started cutting. Here's a shot of what things looked like, part of the way through that process:
I spent about an hour and a half between the last couple of evenings finishing up the install of a CB radio into the center console of my car. To come up to speed, you may want to check out part 1 and part 2 of this project. Okay - now that you're up to speed, all I really had left to do was to make the permanent mounting panel to replace the temporary wooden template that served for test-fitting purposes.
At this point, the process was fairly straight-forward. First, I put some tape onto the piece of HDPE that I had gotten from Tap Plastics to both protect it, but also so that I had something to mark on. I then traced the plywood template onto this, and started cutting. Here's a shot of what things looked like, part of the way through that process:
Once all my cutting was done, I screwed the mounting bracket to this new panel. The way that worked was actually to screw 2 small L brackets to the panel, and then I screwed the CB mounting bracket to the L brackets. This was needed because of the angle at which the CB was mounted.
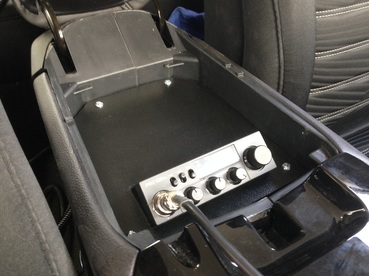
With the part cut, and the radio in it, it was time for a quick test fit:
With the part cut, and the radio in it, it was time for a quick test fit:

|
If you checked out parts 1 and 2 of this project you'll know that I had installed brackets for this panel to sit on. At this point I used my trusty tap set and drilled through the plastic, into the metal. I then used a slightly bigger bit to drill the holes the in the plastic out just a little larger, and then I used the tap to add the threads to the holes in the brackets.
|
|
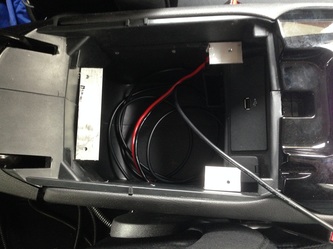
All that was left to do was to screw the panel in place! I also used a very thin bead of black caulk around the radio, where it passes through the opening, just to hide my not-perfectly-straight cut a little bit - I don't have a very good jig saw so cuts that I can't do on my table saw or mitre saw can give me a hard time.
Done! Now I've got my working CB in place, and when the center console lid is closed, it's neatly tucked away. You may notice that there is a lot of empty space behind the radio in this panel. With a bit of luck, and some spare $$ I hope to eventually put a screwdriver controller there for the Tarheel Antenna that I don't own yet. One can dream, right?
On to the next project! Leave a comment and guess what it might be (if you read some of my other posts, you might be able to figure it out!)
Lastly - I've been pretty please with this little CB radio - you can get them fairly cheaply through the jungle, so please check it out:
On to the next project! Leave a comment and guess what it might be (if you read some of my other posts, you might be able to figure it out!)
Lastly - I've been pretty please with this little CB radio - you can get them fairly cheaply through the jungle, so please check it out:

 RSS Feed