NOVEMBER 3 VICTOR ECHO MIKE
  • Blog
  • Events and Activations
  • Diversions
  • About
  • Gallery
  • Contact
  • Links
  • Subscribe
  • Search
  • Blog
  • Events and Activations
  • Diversions
  • About
  • Gallery
  • Contact
  • Links
  • Subscribe
  • Search
NOVEMBER 3 VICTOR ECHO MIKE

ham radio Projects and musings from a (Relatively) new operator

Elastomeric Carbon Zebras

1/10/2018

0 Comments

 
Say what?!
Picture
     No, I haven't completely lost my mind and started genetic experiments to try and create stretchy wildlife that will transfer an image from one sheet of paper to another (remember carbon paper?)  These are all words that apply to a type of connector that I didn't have much familiarity with until a couple weeks ago, which also happen to be present in a lot of electronic devices - including our ham radios!

     To some folks this might be old hat, but for me it was another learning experience that I'd like to share, because I'm sure there are other people out there like me, always learning new things.  With that little tidbit, here's my story - enjoy!
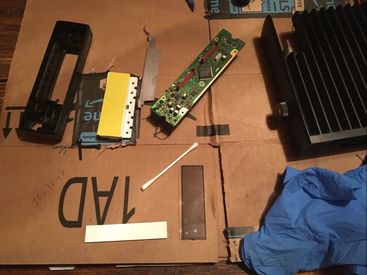
     One of the local club members had a radio that didn't seem to be making proper contact for the mic, because it wasn't always keying up, or would key up, but no audio would be transmitted, etc.  In the process of plugging the mic in and out to try to figure out the problem, the little retention clip on the RJ45 plug broke off, so he needed to put a new plug on his mic cord.  I helped him put the new plug on, but the mic jack was still being finicky.  I decided to take the radio apart to see if the mic jack was one that could be easily removed from the board and replaced.  After doing that, taking pictures to see about ordering a new jack, and reassembling the radio, the LCD display had missing segments.  Uh Oh.
     I ended up taking the radio home to spend some time doing battle with it, to get it working again.  Inside the radio there was a lot of oily residue, which I suppose was contact cleaner.  Now, many contact cleaners and oils that are used to coat and clean electronics are non-conductive, but I have learned from something we found at work, that non-conductive liquids can cause problems, because sometimes in the process of them doing their thing, they just move dirt around, and if the dirt gets in the wrong place (like between relay contacts or into pizeo buzzers), it can do strange things.   File away that note, it will come back shortly.
Picture
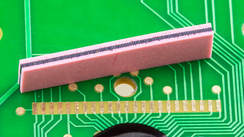
An elastomeric connector - similar to the one in the radio I was working on.
     In the process of taking the radio apart, I also came across the funny rubber strip (elastomeric connector), often called a Zebra (brand name) connector, that makes the contact between the circuit board and the LCD display.  I've seen these before, but never really messed with one - all I knew was that through some unknown magic it conducted electricity between these two parts.  My gut told me that this magic wasn't happening, so I did a little Googling, and determined that I might just have some dirt or oil (remember that thing I mentioned in the last paragraph...) that was keeping this little connector from working, and that cleaning with alcohol was the ticket.  With that bit of information, out came the rubber gloves, q-tips, and alcohol (isopropyl, not Jameson).  I spent a good bit of time cleaning all the old residue out of the radio.

Picture

     After all the detailed cleaning work the result was.......nada.  Still the same problem.  I figured that maybe the easiest thing to do was to just get a new Zebra connector.  The Icom service manual for the 2100H had them listed with a part number, so I called Icom.  It turns out they don't have parts available for this radio any longer.  My next stop was to see what I could find via the electronic suppliers, but I came up short.  I did happen to stumble on the website of a company that manufactures these things, and does prototyping service, however. I called them in the off-chance that maybe they do some retail sales.
     That's where my luck changed - the guy that answered the phone just happened to be another ham, named Don - what are the odds?!  Anyway, because of the ham-brotherhood he spent some time talking with me about these connectors (the company he works for only does manufacturing for wholesale, or larger orders than I would have been making.)
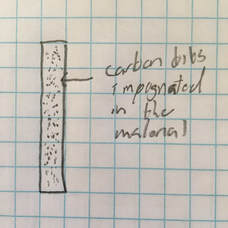
     Basically, the way these connectors are made, is in super-thin layers.  The first layer is basically just a rubber-like material, the next layer is the same stuff, impregnated with carbon, the next layer is just the rubber-like material, etc.  This means that every other layer is conductive, so you end up with a strip that is something like this:
Picture

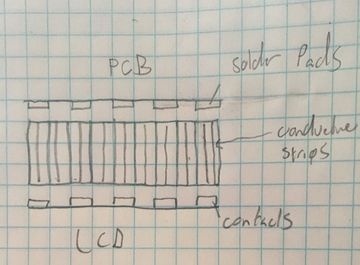
     The thing that I found most interesting, that Don explained to me, is that these strips aren't actually completely conductive - if we zoom in on a single strip, at the microscopic level, what we have is something like this:
Picture

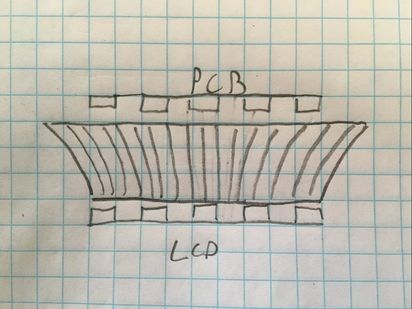
     Basically, the little bits of Carbon have to touch each other to conduct electricity, so these connectors have to be under enough pressure to squeeze them all together, but not so much pressure that it deforms the strip and causes things to make / not make contact where they are / are not supposed to.
     Don also explained to me, that these strips can unfortunately have a "memory" so sometimes after being in use for a while, they don't really go back together like we'd expect.  Also, because of the nature of how these strips work, they need to be supported as you put things together, so that they line up properly.  In the case of the Icom rig, there are plastic pieces that go in place around this strip to hold it, but from this conversation, I realized what my problem was.
     Whether it was from manufacturing, or from "memory" over time, the strip in this rig was actually too long, from side to side.  If it was this way from the start, the machines that assemble the radio probably do all the hard work, and kind of "force" the rubber down to the size needed as it is assembled.  Regardless of how it happened, I could tell by looking at the strip (and measuring it) that it was several mm too long.  When I put it down into it's slot, I had to force the bottom, which made the sides flare out, giving me something like this:
Picture

     Pretty obvious now what was going on, isn't it?  With that bit of knowledge, I trimmed the strip down to it's proper length, put everything together, and presto:
Picture

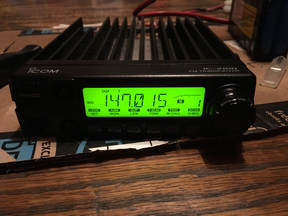
     As a side benefit, I think some of the oil and dust mixture may have been the root cause of the mic connection issue as well, because after finally getting everything clean, and back together, the radio is working like new.  In the true ham-spirit, the whole repair didn't cost anything other than my time, so everyone's wallets are happy as well!
     P.S.  As a side note - I wouldn't recommend randomly cutting connectors down if you have the same problem - I have to assume that most radios come from the factory with everything cut to the proper size - this was probably just a fluke.  If you have similar issues though, you can try cleaning the ends of the connector with alcohol, using small strips of tape to "shim" around the connector (another tip from Don!) to help it stay in the right place, use tape or washer shims under/over the boards or to help the board put additional compression on the connector, etc. You get the idea - whatever it takes to hold the thing in place, and make sure there is enough "squeeze" to make the little carbon atoms touch each other!
0 Comments

Unfinished Business

1/3/2018

2 Comments

 
     Well.....hello there.  Welcome to 2018!

     Now that the holidays are in the bag, it's time to start running full steam ahead with a new year of work, projects, school, volunteerism or whatever else takes up your time (or if you're like me, a little of all the above!)

     Rather than write resolutions this year, I decided to point out the fact that, just like a large portion of hams, at any given time I have several unfinished projects. There was a time when this would make me completely bonkers, but I've really come to terms with it, and now view it as having many opportunities to work on things when I have some free time.  With that thought in mind, here are my "opportunities" that I'm starting 2018 with, that all of you will get to follow along with as time marches on throughout this next year - enjoy!
Home Shack Build
Current status: dry-walling
started project: way back here

Mobile Shack
Current status: in-use, but always in progress
started project: also, way back here

​
Crowd Sourced Project
Current status: ready to start mounting hardware
started project: a few months ago

Learning CW
Current status: 5wpm. Haven't made a CW contact for a couple months.
Started project: when I started activating parks, post NPOTA

Little Helper's Analyzer
Current Status: not done.  My little helper and I are working on building the HR360 AA project when we get time, and when her little brother isn't around to try and steal the parts.
Started Project: I'd have to check my Digi-key receipt.....

The semi-secret, somewhat radio related project
Current status: In the garage.  I gave sneak peeks on Instagram a while back, but still need to put on the finishing touches, and then explain what it is and how it's radio-related.
Started project: Sometime around my YL's last birthday.

The Secret Project
Current Status: Yes, it's still going on - but this one I insist on finishing before I share.  It will (someday) be a series of posts, back-to-back
Started project:  Scared to admit how long ago at this point....

Those things alone are enough to keep me busy for the next 12 months, but I'll invariably end up picking up another project or two along the way, so I hope you'll check back often to see what I'm up to (and maybe even give your input and advice!)

So for now, I'm out - catch you later!
2 Comments

Dusty Progress

12/6/2017

0 Comments

 
     It was a busy week!  I was out of town last week doing one of my multi-city sprints for work, where I spend long days working, and then my nights driving between cities.  I did get to make a couple of HF contacts, and have a couple chats on repeaters around Long Island, New York City, and the Hudson Valley, but that was really it for my on-air activities.
     The radio related thing that I really did last week, was starting to hang drywall.  That's the reason I got to spend so much time wearing these things, and practicing my Darth Vader voice:
Picture


     In the interest of brevity though, I'm not going to bore you with all the details, because I haven't actually started the drywall in the shack yet.  My shack project is part of a larger project of finishing the basement in our addition, and refinishing part of the space in the original house.  The drywall I was hanging was for the ceiling, but If you'll recall from earlier posts, the ceiling in the shack is actually already done, and it looks like this:
Picture

     The ceiling I was working on was actually the ceiling in the rec-room, which is the room that just last week, I ran some cable through.  This means that while the drywall I hung wasn't in the shack, it means I'm now committed to what I ran into the shack.  The good news however, is that I left provisions for future growth, and I always have the "long way around" option if my shack growth exceeds what I can fit through the area that I gave myself access to.
     This also means that while I finish up the drywall, I won't have a ton of updates on the home shack other than more drywall and paint.  When that's done however, the real fun beings - starting to put together the operating area!
Previous: Shack Build
Next: Shack Build
Back to Part 1
0 Comments

Ready to Close 'em Up

11/29/2017

2 Comments

 
     The walls that is....
     The Thanksgiving break was a productive one for me.  I've been zeroing in on getting my shack project to the point where I'm ready to start closing up the walls with drywall.  This project is actually combined with finishing the part of the basement under our addition, so there were a few things that I wanted to run across the space that will become the rec-room before I closed things up.  To give a little perspective on the space I'm working in, so that you can picture it a little easier, here's a rough drawing of our basement.  The scale is a little out of wack, but you'll get the idea:
Picture

     In my last post I mentioned several things I was planning, and these were precisely the things I ended up getting done.  The first thing I put in was some empty conduit, because even though I am pulling stuff through now, it's hard to anticipate future needs.  In one section the fit was tight, so 1" conduit was the widest I could put in without a lot of concrete busting.  Because of that I made 2 runs side by side, from the back wall of the shack, to an access box that I installed in the back wall of the walk-out basement.

     Next up was the coax.  I ordered enough Times Microwave LMR-400 from DX Engineering to pull 4 runs across the space.  As a side note here, DX Engineering means business with their shipping! My order was big enough to get the free shipping, and it was almost 24 hours on the nose from the time I ordered it till the time it was sitting on porch - impressive!  I ordered the coax in bulk, so I rolled it out lengthwise down the long stretch of the rec-room to cut it into 4 sections.
Picture

In addition to the coax, I also ordered enough for a single run of control cable, anticipating a rotor at some point in my future.  Finally, I knew I wanted some network cable running from the shack to the tower for potential future uses, so (at the suggestion of a couple different folks) I cut 2 lengths of that as well.  With all these cables cut to length, I tacked up the coax right above the conduit runs, and the control cable and network cables to the other side of the joist bay.
Picture

     In a separate area I also pulled a run of 12-2 Romex from the sub panel in the shack, to a location that I can get to from the outside.  My thought here is that if I end up needing power at the tower, I have a line ready for it, powered from the same source as everything else in the shack.
     As hard as it is to do, the next step was to stuff the insulation back in place, and hide all of my hard work!
Picture

     So with all this stuff done, I'm ready to start closing up the walls.  When I eventually do put up the tower, I'll be able to take the cover off this box, roll the coax and cables out of the way, and drill straight through the back of the box and the exterior wall, to put a conduit to an entrance panel right on the other side of this wall, with runs out to the tower.  easy-peasy!

     Next step, drywall.  I've never hung drywall before, but I decided it was finally time for me to try and tackle it on my own.  I won't be working in the blind though - I have a brother-in-law that hangs and finishes drywall, and a neighbor that used to work for a large drywall distributor, so I'll be leaning on their expertise pretty hard.  If you see anything I missed that you think I should do before I close things up, or if you have any drywall tips, please feel free to leave me a comment - It'll be a few days before I get started, and tips are always welcome!
Previous: Shack Build
Next: Shack Build
Back to Part 1
2 Comments

Blowin' in the Wind

11/22/2017

2 Comments

 
     The last time I gave you an update on my home shack, I was running piping for the radon mitigation system in my basement.  Well, I finally put the (hopefully!) finishing touches on that part of the project!
     All that was left for the radon system was to install the manometer on the inside piping (that's the u-shaped thing with the liquid in it, that tells you if the fan is running), and to order and install the fan on the outside of the house.  A weatherproof single gang box and switch, some conduit, and some liquid-tight, did the trick to polish this off:
Picture

     I still have some grading to do along this side of the house from the addition we did, so don't judge my dirt and leaves too hard :-)  With everything wired up and the final bits and pieces in place, it was time to turn the breaker on, and then throw the switch, so that I could say (to the tune of the well known Bob Dylan Song) "The radon my friend, is blowin' in the wind.  The radon is blowin' in the wind."
     With the fan running, I turned my attention back to the inside of the basement, where me and my trusty caulk gun went all over the basement sealing every crack and expansion joint we could find.  All that's left now is to let the system run for a couple of days, and then conduct another radon test to see if I'm done, or if I still have more work to do.

Some Other Stuff Too

     The radon system isn't the only thing I worked on in the last few days.  I also pulled the service cable from the main breaker panel in the house, to my new shack. After weighing cost, distance, current requirements, etc.  I ended up deciding to use 2-2-2-4 cable, protected with a 90 amp breaker.  This kept the cable from being too obnoxiously large, while giving me more than enough capacity for the demands that will be on the panel in my shack.  The next step for this will be to sheath the run that will be exposed in the shack with EMT.  

     In addition to this real work, I did some "planning" work as well.  Before I close up walls I want to run some coax and wire in the general direction of where the eventual tower will be.  Trying to guess how much wire you'll need in the future is almost always bound to leave you wishing you had done more.  Conduit is a great thing, but in the area were I need to run it, I have some restrictions on sizes of what will fit.  After getting some feedback from the twitter crowd, here's what I think I'm going to shoot for:
  • 4 runs of LMR 400
  • 2 empty conduits.  One inch is all that will fit in the one section, but at least it will be there for whatever comes up in the future.
  • 1 multi-conductor control cable (for rotors etc. in the future)
  • 1 network cable (just in case I want to stick any Ethernet devices up there)
  • A couple of strategically placed access hatches

     Luckily, if I find in the future that I missed something, I will still be able to add to this - it will just require a much longer run around the side of the house.  

     If you have any input or thoughts for me, please feel free to share them!  It will probably take me a couple weeks (or a month...) to round all this stuff up and find the time to get it pulled into place.  Till then, have a good one!
Previous: Shack Build
Next: Shack Build
Back to Part 1
2 Comments
<<Previous
Forward>>

    Categories

    All
    Antenna
    Cw
    Digital-modes
    Flying-with-gear
    Home QTH
    Miscellaneous
    Mobile
    Operating Events
    Portable
    POTA
    Shack Build
    Technical


    - N3VEM -

         Welcome to my Ham Radio Blog!  This blog was started primarily to share my two concurrent shack builds - my mobile station and my home station.  Over time, this has grown to include sharing about my operations, and general radio-related thoughts that I have as a newer operator.  
         
    ​Enjoy!

    RSS Feed


    Picture
    POTA!

    Picture
    Proving that hams do indeed still build stuff!

    Picture
    100 Watts and Wire is an awesome community, based around an excellent podcast. 

    Archives

    September 2020
    July 2020
    January 2020
    September 2019
    August 2019
    July 2019
    June 2019
    May 2019
    March 2019
    January 2019
    December 2018
    November 2018
    October 2018
    September 2018
    August 2018
    July 2018
    June 2018
    May 2018
    April 2018
    March 2018
    February 2018
    January 2018
    December 2017
    November 2017
    October 2017
    September 2017
    August 2017
    July 2017
    June 2017
    May 2017
    April 2017
    March 2017
    February 2017
    January 2017
    December 2016
    November 2016
    October 2016
    September 2016
    August 2016
    July 2016
    June 2016
    May 2016
    April 2016
    March 2016
    February 2016
    January 2016
    December 2015
    November 2015


Picture
Copyright © 2015
 Vance Martin is a participant in the Amazon Services LLC Associates Program, an affiliate advertising program designed to provide a means for sites to earn advertising fees by advertising and linking to amazon.com.