NOVEMBER 3 VICTOR ECHO MIKE
  • Blog
  • Events and Activations
  • Diversions
  • About
  • Gallery
  • Contact
  • Links
  • Subscribe
  • Search
  • Blog
  • Events and Activations
  • Diversions
  • About
  • Gallery
  • Contact
  • Links
  • Subscribe
  • Search
NOVEMBER 3 VICTOR ECHO MIKE

ham radio Projects and musings from a (Relatively) new operator

wire, buddipole, & Strange neighbors

10/17/2016

5 Comments

 
Post Contains Affiliate Links
     Over the past couple of nights I'm sure I caused a bit of "what is that guy doing now?" conversation in my neighborhood.  Luckily, my immediate neighbors know I'm a ham, so when they see me messing with masts, wire, and other related tid-bits, they know what I'm up to.  The other people driving by however, probably just think I'm weird. 
      So what "weirdness" was I up to this time?  Oh you know...just the basics - rigging up a wire dipole (oppa, inverted v style - womp womp womp womp).  ​
Picture
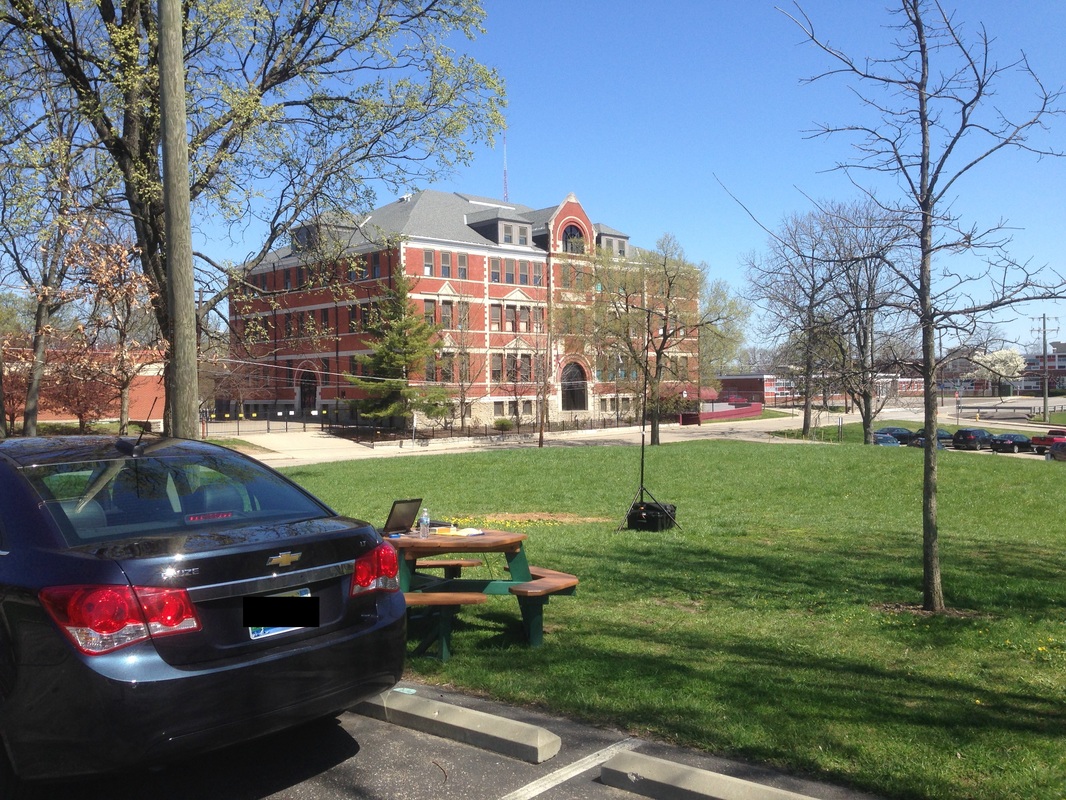
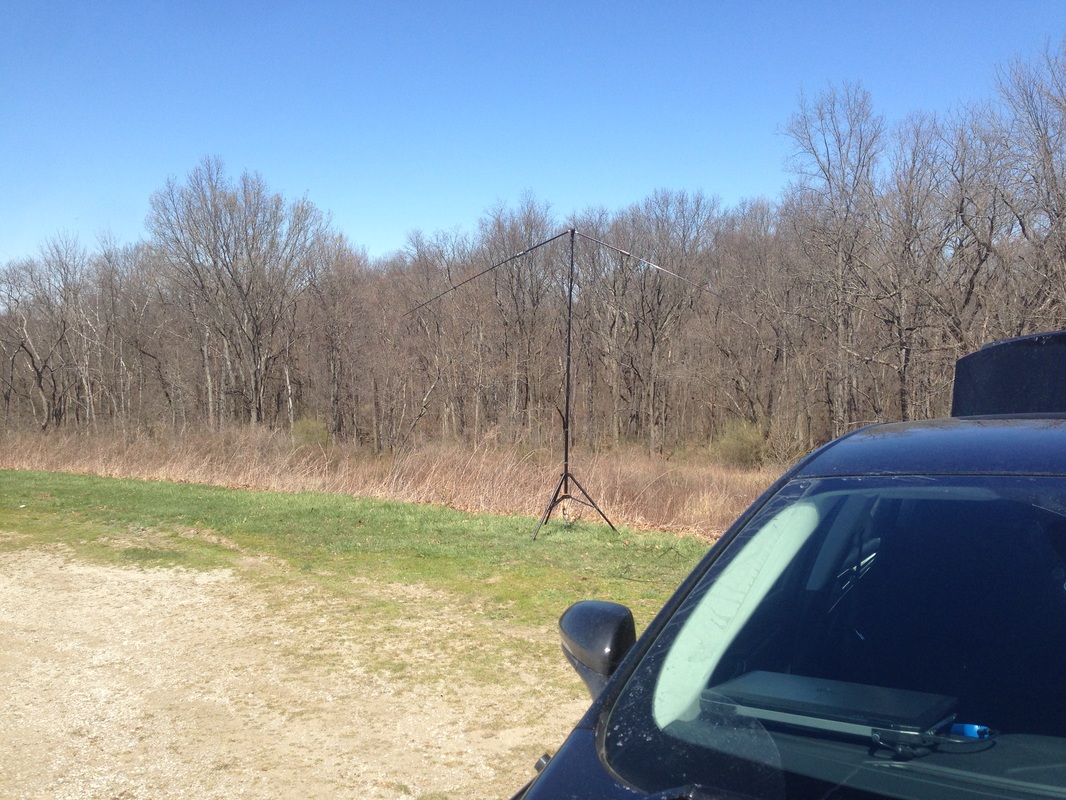
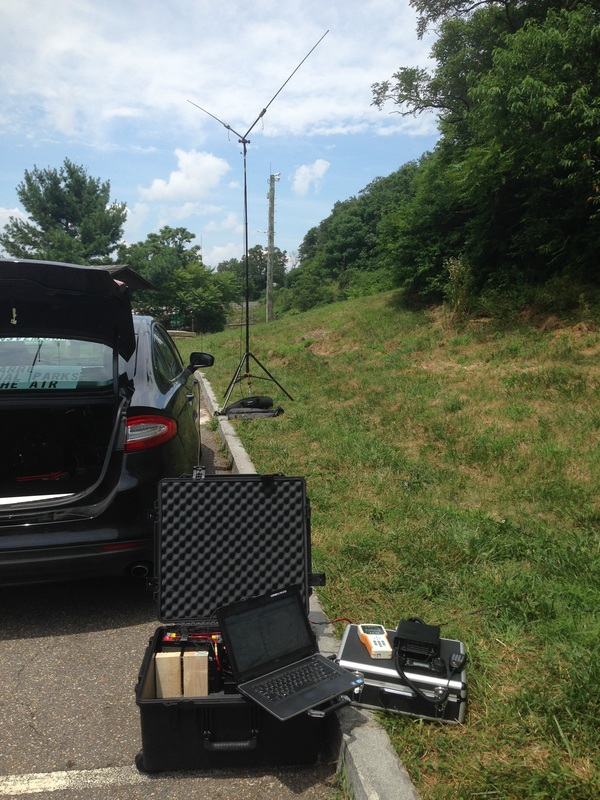
I was doing this (putting up wire, not doing the Gangnam Style Dance) in my front yard, because I was really playing around with something that I hope becomes an addition to my portable kit, and since my radio is in my car, it is easier to rig up an antenna out front, and run the coax to the trunk to test it out.
     Basically, this all started because on 40 meters the Buddipole is pretty narrow-banded.  I wanted the option for a full size 40 meter dipole when doing my portable stuff, and figured since I already had a feedline, a center insulator (in the form of the Buddipole Versa-T) and a bunch of other nic-nacs, I could just rig up a wire dipole to take along, so that I have the option available to me.
     So, first things first - acquire some wire (heh...that rhymed...) You can get wire just about anywhere, but for this project I just used standard 14 Gauge Stranded THHN wire.  If you're lucky, you might even have some laying around!
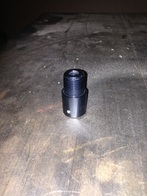
     Next I grabbed a couple of these L style Mechanical Connectors.
     Once I had these, I actually drilled out the hole so that a 3/8"-24 stud would pass through.  I also got a couple spacers with a 3/8" inside diameter from the local big-box hardware store (to be honest I don't remember if I picked these up at the blue store or the orange store, but they probably both have them.)  This combination of hardware gave me a way to attach the wire to the Versa-T (the Buddipole center-insulator/feedpoint), by using one of the Buddipole knobs.
Picture
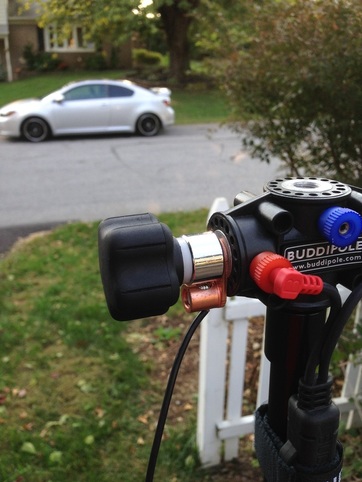
     I've seen people advocate using ring terminals under the connection for the banana plug, but that's risky - it's plastic on plastic, so you're really relying on the inside edge of the ring terminal to happen to be touching the post that runs down the center - there is no firm metal on metal contact if you do that.  My method here firmly clamps all the metal bits together making a good connection, probably cable of handling more power than the wire being connected to it.
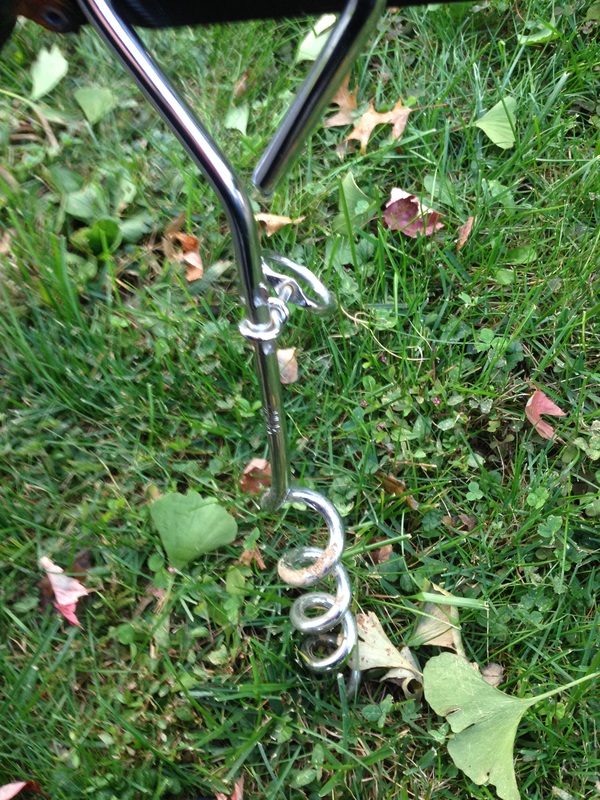
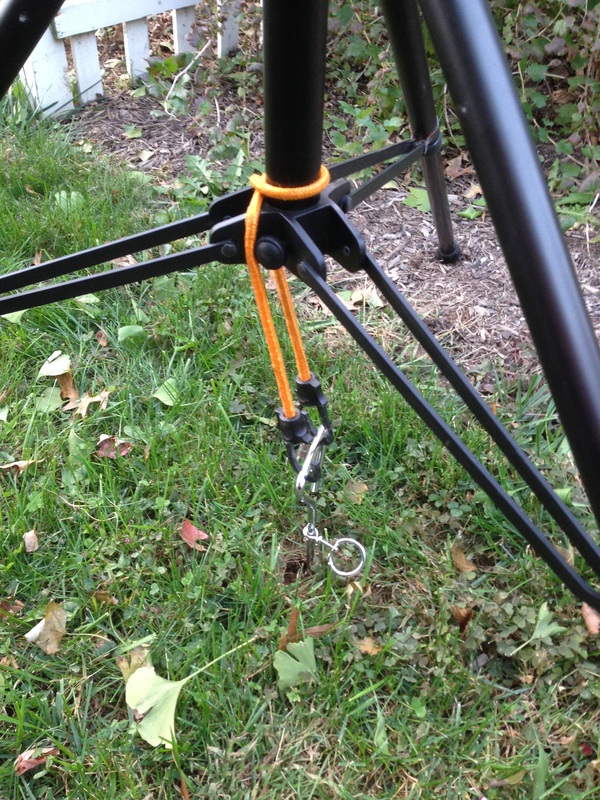
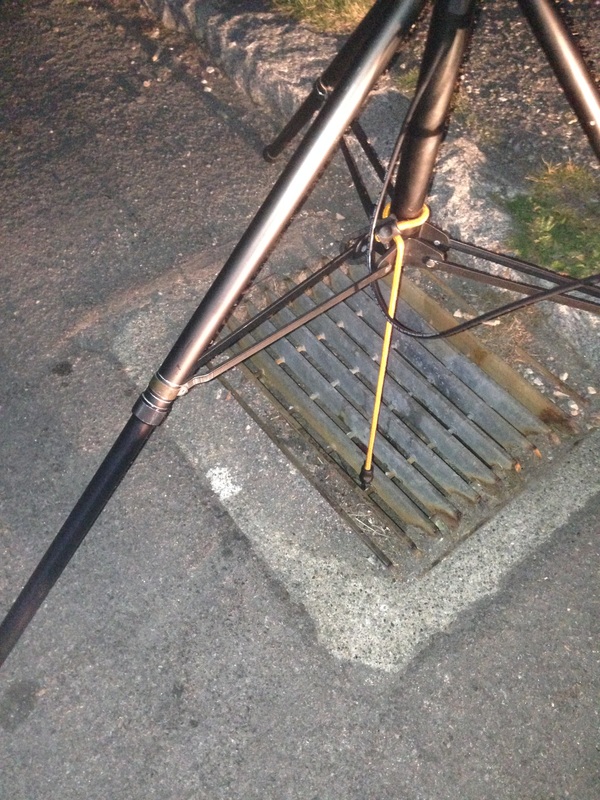
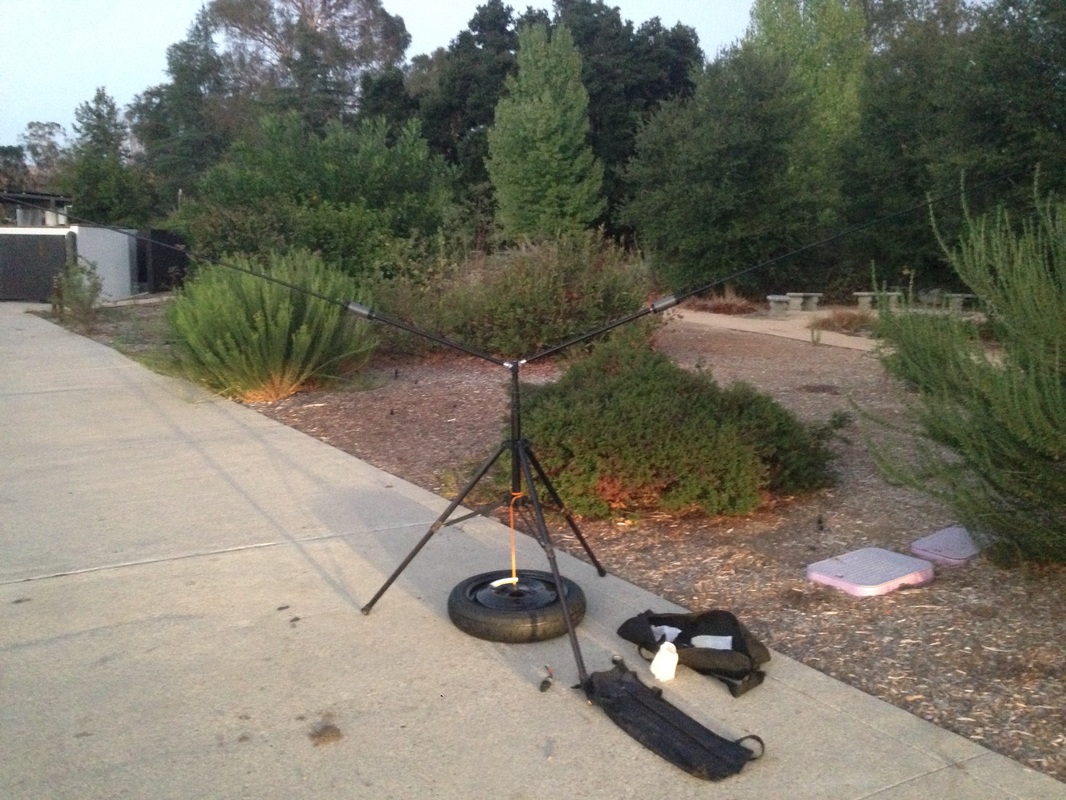
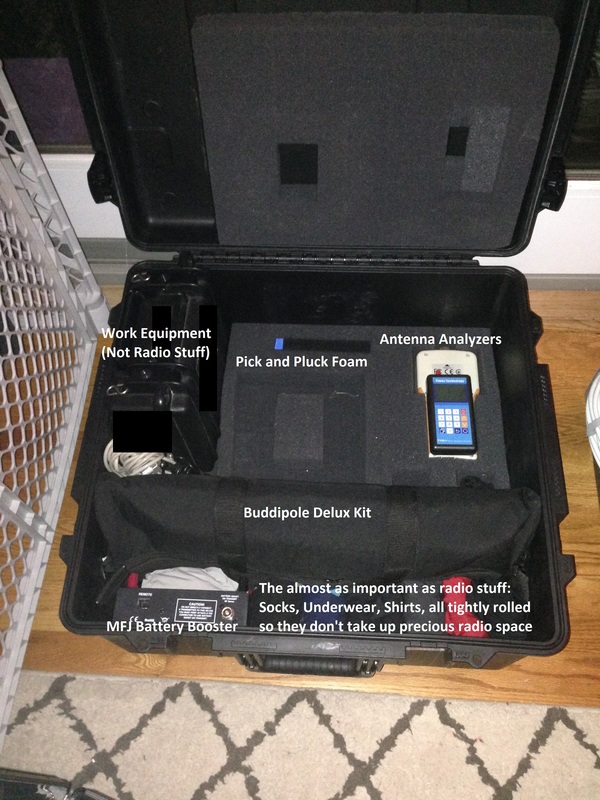
     One quick note on "guying" my Buddipole.  I use a method to simply anchor directly under the tripod instead of setting up bunch of guy wires.  My method uses a ground screw, intended for tying dogs out in the yard, and a bungee cord.
Picture
Picture
     Both of these fit in the bag with my Buddipole.  These ground screws are great - I'd recommend adding several to your go-kit because they are an easy way to guy lightweight stuff, without needing to also carry a hammer to pound traditional stakes into the ground.  Just make sure you know that you aren't screwing into something important!
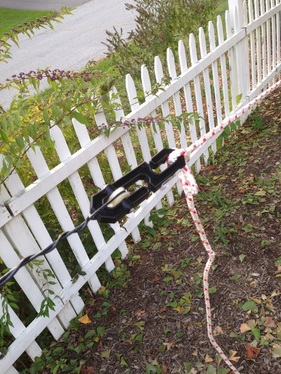
     At the other end of the wire, I used a small Pulley/Hook assembly that also came from the hardware isle of one of the big box home centers.  This made it easy to tie a rope too, which allowed me to tie the rope off to a stake, and also pull the wire through the pulley.  Since this is for portable operations, I didn't do any permanent clamping - just twisted the wire back around on itself when I had it tuned to the length I needed.  This method also makes tuning easy because I can just wrap more or less of the wire back on itself to adjust the length.
Picture
     Also, even though it was probably not necessary, I decided I wanted the legs of the dipole to end just a little higher than where they ended up being, so I grabbed a couple driveway markers that I had in the garage, and stuck them in the ground and looped the rope around to bring the wire height at the ends up just a little bit.
Picture
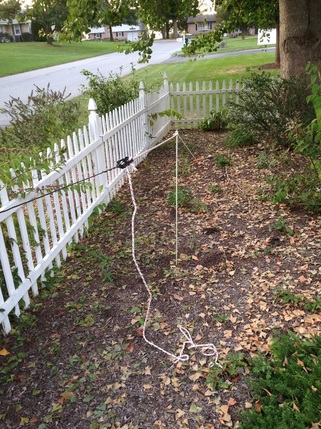
     Along these lines, these fiberglass driveway markers are probably a good thing to have, to take along to events like field day so that you can mark off where coax is, run caution tape from post to post to block off area's around antenna's, support twin-lead off the ground, etc. etc.
    Tuning the wire took a little longer than normal, because aside from the normal up and down activity to adjust the lengths of the dipole legs, I was also being "helped" by future operator 1, while carrying future operator 2 (who had gotten tired of being in the stroller).  This means that most of the tuning was done one-handed while I said things like "don't put that there!" and "stop throwing sticks around!"
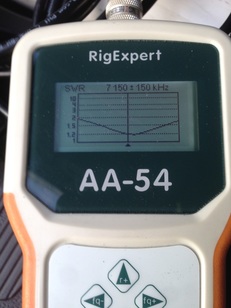
     It was all rewarded in the end though with:
​ 1)  A decent SWR across the band:  
Picture
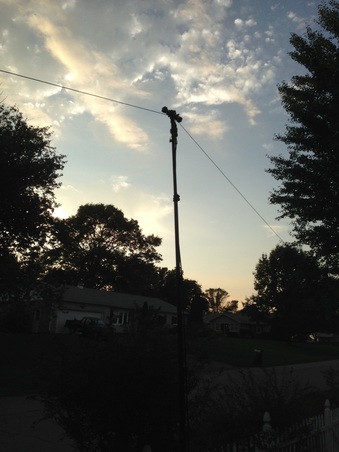
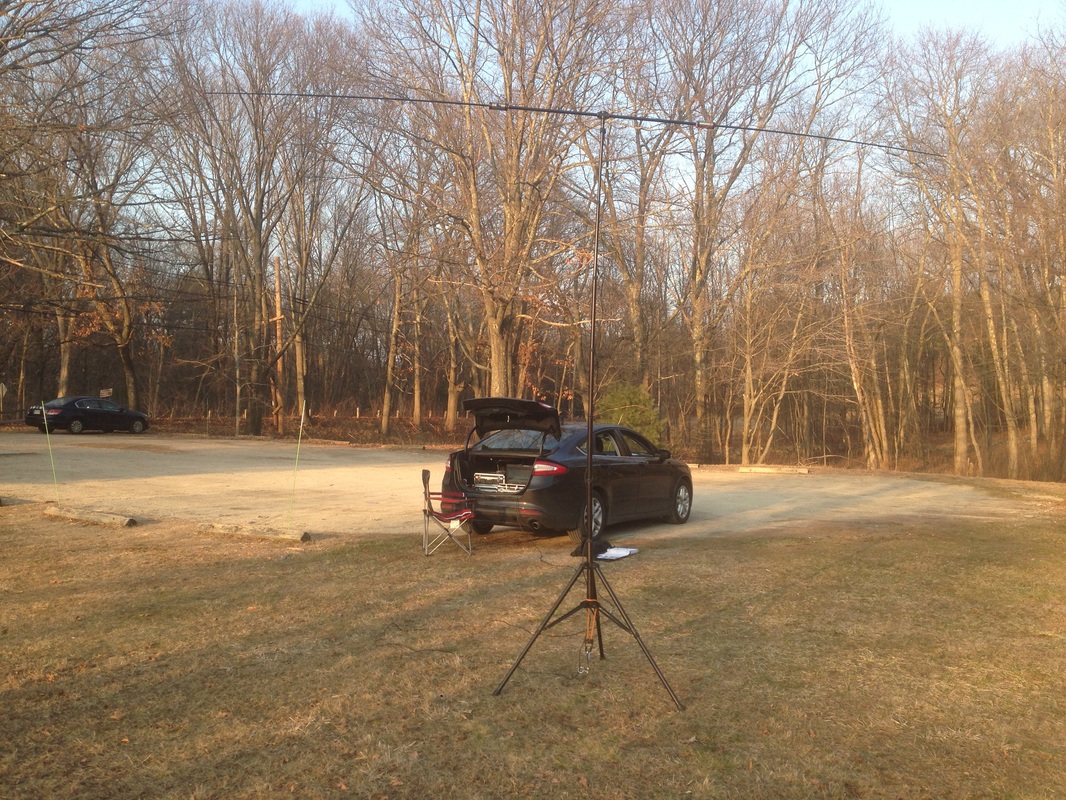
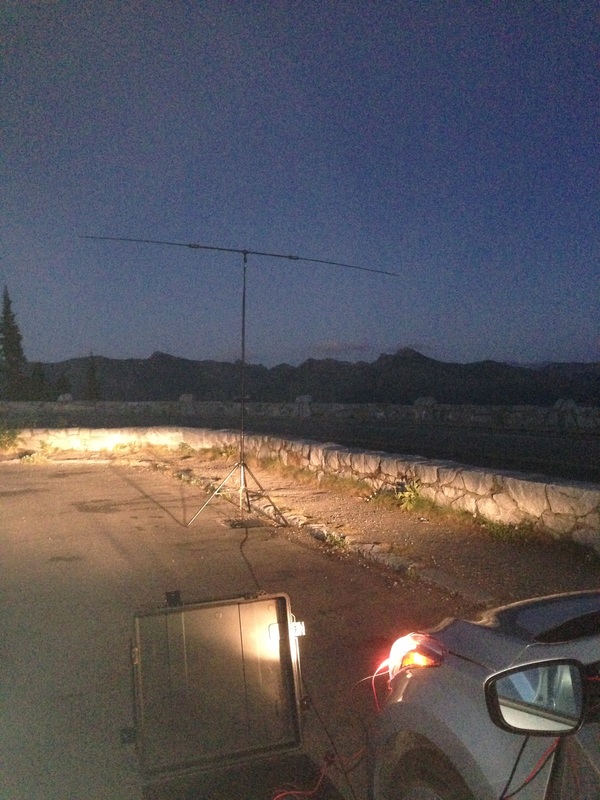
2)  A rather picturesque "wire at a cloudy sunset" shot
Picture
3)  A contact with an Elementary School Radio club from a couple states away, that was on the air for the school-club-roundup.
     So, after all that, I now have a couple lengths of wire with some attached hardware that I can use in conjunction with my Buddipole.  In places where stakes aren't an option I often weigh down the bottom of the Buddipole with the spare tire from the car, or some other heavy object, and the ends of the dipole legs can be weighted with water jugs, logs, rocks, or whatever other medium-heavy object nature presents me with.  Because of the height of the center of this dipole, the antenna in this configuration is definitely more of an NVIS setup - at least until I lay hands on that taller mast I've been eyeballing....

     Once again, thanks for stopping by!  Please feel free to stay awhile and click around the categories at the right, and the links at the left for more Ham Radio fun and musings!
5 Comments

FCC Part Ninety-what?

10/15/2016

3 Comments

 
     So, I had a couple random thoughts bouncing around in my head that drove me to grab my copy of part 97 (Since my station is my mobile, I keep a binder in the car with manuals, FCC part 97, etc.  we really should all have a copy in our stations)  Maybe this is just the ignorance of a newbie, but there are a couple "lawbreakers" I noticed, that made me question things.  And no, I'm not talking about the flagrant misbehavior of those couple odd-balls who hang around the frequencies we all spin past without stopping - I'm talking about some "minor" offenders - so without further ado here we go with Case Number 1 (Case 2 will be a follow up post sometime in the near future):
Picture
Case Number 1
     I was driving down the highway on the way home from a recent work trip.  So that I don't accidentally incriminate anyone, I won't tell you where I was, other than to say I was actually on an Island.  A Long one.  So anyway, I happened to be monitoring the national FM calling frequency (146.52 MHz for the couple non-ham readers that I have.)  Now, usually I can drive for some pretty good distance without hearing anyone calling on FM Simplex, but on this day I heard, clear as bell "Is anybody around on five-two?"  At first I grabbed my Mic, but I ended up not answering the call because I thought it was odd that I didn't hear a call sign.  Isn't that illegal?
     I looked in my copy of part 97 just to be certain, and like many other things in Ham Radio, I realized the answer is "it depends."  Our practice of identifying ourselves when we call CQ, or call out on a repeater or (like in this case) FM simplex is actually not required.  The real requirement is to identify at the end of each communication, and every 10 minutes during it.  Now, at the end of each communication obviously doesn't mean every time you stop transmitting, otherwise we would all be identifying every single time, right before we let go of the PTT switch. 
     This means that technically, as long that station identified within the next 10 minutes, or at least followed up at some point with something like "Nothing heard, clearing frequency, X0XXX" he would have been legal.  I must admit I didn't time how long it was before I ended up tuning away, but it felt like 10 minutes, and I didn't hear anything else.  Either way, please ID yourself when you call, it's a common courtesy.  After all, I wouldn't come knock on your front door wearing a mask so that you don't know who I am, so why would you knock on my airwaves while wearing yours?

Thanks for reading!  Check out the Categories menu to the right to read some of my other posts, and also please check out the menu to the left for more info about me, some pictures, related links, to subscribe to my blog etc.
3 Comments

why me

10/11/2016

0 Comments

 
     Did you ever feel like the forces of fate collaborated against you?  Okay, so maybe that's a little extreme in my case, but I did have a couple things line up against me, that if nothing else, could be considered bad luck.
     This week started with a drive to Long Island for work (the Hauppauge area.)  With the on-going NPOTA event, my work trips usually include a stop at a park, so I was looking forward to maybe activating one or two of the parks up here while on the trip.
     Day one of the trip involved traveling, getting to the office, having the "day 1" meeting to review the upcoming activities for the week's visit, getting dinner, and getting back to the hotel.  I managed a quick peek at Google maps and the NPOTA site to decide where I might head later in the week, I did some reading (for the sociology class I'm currently taking), I had my daily chat with the family, and then I went to bed (not all in that exact order, but there-abouts).
      Waking up on day two I had a quick peek at the propagation forecast, and thought - wow!  This should make for some great contacts after work today!:
Picture
     And then luck looked back and me and said - Nope!  
     As I climbed in my car (yes...the less than 1 year old Fusion that you've seen in my other posts) and turned the key, I was greeted with the check engine light, and extremely rough idling.  Uh-oh!!  My regular readers might recall that when I activated Acadia during a family vacation I had a similar experience with this very same car.  Grrrrr.
     Last time the car wouldn't even drive when this happened - pushing the gas pedal down caused nothing to happen.  This time, the car moved, so I decided to brave it, because it was only 3 miles to the first stop for the day.  The car kept doing the same thing, and even at speed, the whole car shook like a rat at the Jellicle Ball.  So...I called a tow truck, sent the car off to a garage, and hitched a ride for the rest of the day with my co-workers.  This also means that at the end of the day I was dropped off at my motel, with no means of transportation to get myself to any parks.  It also means that I'm stuck hitching rides in Long Island until my car is fixed.  If I'm lucky, my car will be fixed quickly, and I might still be able to activate a park.  If I'm not lucky, I might be getting a rental to drive home and leaving my car behind while it gets fixed (again.....come on Ford - did I get a lemon?! [Ed.  The car is fixed - apparently this time a rodent chewed through an ignition coil wire, sorry Ford for getting mad at you!])  Oh well....at least there's the HT I have in my backpack, and Echolink so I can check out the local repeaters and check in to my clubs net on Wednesday (Node 380019 at 9pm EST if you want to join us!)  Hopefully that will give me enough of a shot in the arm that I won't go through complete radio withdrawal while I'm stranded at the hotel. 
0 Comments

new mast

9/24/2016

2 Comments

 
Post contains affiliate links
     That's right - feast your eyes.  You're looking at the words of the proud owner of a brand new Buddipole mast.  If you've been reading my blog for any length of time, you probably already know that I use my Buddipole pretty often.  In case you don't believe me, here's some of the evidence, from since the beginning of the year only, that has appeared in other places on my blog (it's easier to see in some pics than others):
     So, why a new mast?  If you read my post on my attempted Mt. Rainier activation for NPOTA, you can see the headaches my old one caused.  Basically, it broke.  Not like snapped in two broke, but more like won't stay up broke (no snickering allowed...)  Luckily, my YL, having midnight visions of me driving off a mountain, had decided to check the NPOTA Facebook group to make sure I didn't, in fact, fall off the mountain.  This meant that when I got home, she wasn't surprised to hear me say "is it cool if I buy a new mast?"  
    When the new mast came, I was pumped, because Buddipole has changed the design since my version, and it is a LOT better.  What made the old design wear out?  Basically, the old design used a threaded ring that would squeeze a plastic ring to loosen or tighten the fit between the mast sections - the exact same way the drain on your bathroom sink connects all those trap pieces together!
     While this isn't a bad design, it's easy to see how after hundreds of trips up and down, the metal would grind away at that plastic ring, causing some parts to stick, others to never get tight, etc.  Here's what tightens each section on my old mast:
Picture
    Another thing I learned with the old design, was that if something was just a little loose, and the wind spun the dipole, it would loosen and tighten the threads on these sections - I only had it happen enough to make a section drop down once, but I'm sure it caused unnecessary wear on these parts. 
     Before you think I'm busting on the design - don't!  It gave me a lot of faithful service, and part of portable operations is accepting that fact that when you thread things on and off, put things up and down, and otherwise move things that were really intended to be sitting still, things will wear out.  Based on the pictures from the buddipole web site, I thought the new design looked better - when it arrived and I had it in my hands, I was like - oh yeah baby, that's the good stuff.
Picture
     The new clamping mechanism is much sturdier, and it uses a big thumb screw which is waaaay easier to tighten and loosen.  Also, because this is a clamp that is external to the mast, rotational forces from wind, etc. on the mast won't act to loosen them - awesome!
     So, side by side comparison?  Other than the much improved clamping mechanism, the new mast is just slightly longer when collapsed, because of the larger clamps, but that's not a big deal because it still fits in the original bag. 
Picture
     As an interesting note, even though it's longer collapsed, the new mast is actually slightly shorter when extended, than the old one (but only by a couple inches):
Picture
     Considering how short the mast is when compared to something on a tower or in a tree, I don't think these couple inches will make or break the deal for any of my contacts.  
     Technically, there is also now a longer mast available from Buddipole that extends to 18', which I really contemplated.  If you've seen how I pack my bags however, you could see that the longer mast doesn't fit my packing arrangement.  For trips where I am driving however, (which are actually more often than the trips where I fly.) It would be nice to have a longer mast.
Picture
     That thought rolls right into my next scheme.  My original mast is now in the metal recycling except for one part - the little threaded adapter for the tip.  That part actually just had a small set screw, and it fits over something that is 3/4" in diameter.  I'm now eyeballing some masts from a specific supplier (I won't name names unless I actually buy one and can vouch for it) because they have a 3/4" top section that I could put this part on, and they have models that are as tall as 50'.  I probably wouldn't go with one quite that big, because fully collapsed I'm not sure it would fit in my car.  they do have models that would fit nicely however, that are still in the range of 40'.  I start to drool when I think about the potential to actually get a portable antenna that high in the air when there are no trees around...

     Final thought - If you don't currently use a Buddipole and you're thinking about getting one, I do strongly recommend using an analyzer to tune it.  The Buddipole does come with a "cheat sheet" for how to set it up, but because of the variables involved, you're rarely going to hit the sweet spot by just using the tuning chart - in fact sometimes it can be off significantly, especially on 40 meters where a short antenna with loading coils is very narrow banded.  If you don't have an analyzer, I can strongly recommend the RigExpert AA-54 because it is the one I use.  You can get it from Amazon, or you can also now get it from my newly created affiliate store which is always available from the menu - check it out!
2 Comments

flying ham

9/21/2016

3 Comments

 
post contains affiliate links
Picture
     Okay okay....not that kind of flying ham.  I meant this guy (*N3VEM points both thumbs at himself*)  
     So, I quite regularly see folks asking questions about traveling with Ham Radio equipment on commercial flights.  Short answer - it's easy!  As much as we think people will get excited about our radio equipment, at the end of the day, TSA sees much weirder stuff than our radios and they don't get paid enough to care about our specific brand of geekiness (is that a word?) In fact, ham radios are so non-exciting to TSA that they specifically give them the greenlight for either checked baggage or carry-on.  They just give you the generic warning about being careful how you pack electronics so things don't get damaged.  Like any other large electronics you just have to take your radio out and send it through the x-ray machine on its own if you carry-on (from experience, the 857d is considered large, but the MFJ 30 amp switching power supplies and LDG tuners are not.)
     With that bit of information out of the way, I figured the easiest way to show how I generally travel with my gear, would be to do a photo-journal.  Depending on the trip, I can sometimes get everything I need into just my carry-on/personal item (see Packing the Bags that I wrote before a trip to southwestern Ohio) but often times for work, I'm taking other equipment, so I have to take a checked bag anyway.  I would imagine that when most people travel they are doing the standard 1 checked bag, 1 carry-on, 1 personal item arrangement.  Without further ado, here's how I fit my ham radio gear into that situation for a week-long trip (I am willing to re-wear things like pants, but I insist on clean socks and underwear....):
I start with this.  I use this because it's provided by my work, to move some of our equipment around in, but it's within the size limits of checked baggage, so you can do the same thing in any large suitcase:
Picture
  • Pelican Storm Case
     Next I put a layer of pick and pluck foam in the bottom of the case, followed by the first layer of my stuff:
Picture
  •   Rig Expert AA-54 HF+ 6m Antenna Analyzer
  • MFJ Battery Booster (I'd go straight to the manufacturer for this)
  • Buddipole (Again, straight to the manufacturer is the best bet here)
  • Times Technology VHF/UHF Antenna Analyzer (the model I have is no longer available, but you should be able to find the replacement models with a Google search)
  • Underwear (I honestly recommend these...they're awesome)
Next Layer:
Picture
  • My Coax came from one of the common ham suppliers
  • My shirts came from wherever my YL bought them (probably Target :-)
 And then.......
Picture

Get ready for it.....
Picture
  • The cell booster is a good solution if you have cell signal outside your house, but it's weak down inside your basement shack.
  • ​No top secret wire supply house here - just whatever I can get my hands on
But wait, there's more:
Picture
  • Power poles and don't forget the crimper
  • Battery clamps
There's still room in the box...
Picture
  • Pants are my old company provided uniform pants - standard service tech Khaki
Is he done yet?  Nope....
Picture

Will you just close the lid already?  Okay, but this was only the checked bag - I still have my carry-on and personal item!
Picture
  
So, there's the checked bag.  You might have noticed that there was no radio in there....that's because I prefer to carry that on so that I can keep my eye on it.  I use an old, hard, laptop case as my "personal item."  The specific one I use isn't available anymore (I bought it with a laptop about 100 years ago...) but there are similar models out there.  This is another case where I put the stuff in, and then just pad as needed with foam.
Picture
  • Yeasu 857d
  • LDG YT100 Tuner
  • MFJ 30 Amp Power Supply
  • Signalink USB (make sure you get the one that matches your radio)
Finally, done packing.  Here's the goods, ready to roll out the door:
Picture

     But wait, you say, you didn't tell us what was in the backpack, or where you got that awesome backpack with your callsign on it (L.L. Bean.  It was an anniversary gift from the YL, and I love it!)  
     I didn't show you the inside of that, because the backpack is whatever other random stuff I happen to take along.  It usually includes my toothbrush, toothpaste, deodorant, comb (I rely on the hotel to provide any other needed toiletries), an issue or 2 of QST, whatever book I happen to be reading at the time, my Samsung Tablet, my Laptop, and an HT and it's charger.  Sometimes even a spare set of clothes or extra pair of shoes.  
     The last recommendation I have is the headphones you see hanging through the bag.  I love them, because they communicate wirelessly (bluetooth) with my cell phone and tablet for making calls, watching videos on the plane, etc.  but they also have a wire that you can plug in and use in an analog fashion, so I use the same set of headphones to plug into my radio if I don't want to rely on the built in speaker in the 857d (I still use the hand mic for transmit audio.)  They are the Skullcandy Hesh 2 headphones - I don't go anywhere without them because it's one set that will do it all!
     Now that you've seen how I pack, and you've gotten some of my recommendations for the gear I use, do you have any questions?  Are you ready to grab your gear and zip across the country?  Are you confident that all those folks who talk about the scary TSA people and all the weird things they will do to you and your radio probably aren't speaking from personal experience, now that you've seen what someone who actually flies multiple times a month takes with them?  I took all these pictures while packing for last weeks trip to LA, when I activated the Santa Monica Mountains for NPOTA, so check out my post called Pop Culture Central to see how I set this stuff all up on the other end.   
N3VEM out.
3 Comments
<<Previous
Forward>>

    Categories

    All
    Antenna
    Cw
    Digital-modes
    Flying-with-gear
    Home QTH
    Miscellaneous
    Mobile
    Operating Events
    Portable
    POTA
    Shack Build
    Technical


    - N3VEM -

         Welcome to my Ham Radio Blog!  This blog was started primarily to share my two concurrent shack builds - my mobile station and my home station.  Over time, this has grown to include sharing about my operations, and general radio-related thoughts that I have as a newer operator.  
         
    ​Enjoy!

    RSS Feed


    Picture
    POTA!

    Picture
    Proving that hams do indeed still build stuff!

    Picture
    100 Watts and Wire is an awesome community, based around an excellent podcast. 

    Archives

    September 2020
    July 2020
    January 2020
    September 2019
    August 2019
    July 2019
    June 2019
    May 2019
    March 2019
    January 2019
    December 2018
    November 2018
    October 2018
    September 2018
    August 2018
    July 2018
    June 2018
    May 2018
    April 2018
    March 2018
    February 2018
    January 2018
    December 2017
    November 2017
    October 2017
    September 2017
    August 2017
    July 2017
    June 2017
    May 2017
    April 2017
    March 2017
    February 2017
    January 2017
    December 2016
    November 2016
    October 2016
    September 2016
    August 2016
    July 2016
    June 2016
    May 2016
    April 2016
    March 2016
    February 2016
    January 2016
    December 2015
    November 2015


Picture
Copyright © 2015
 Vance Martin is a participant in the Amazon Services LLC Associates Program, an affiliate advertising program designed to provide a means for sites to earn advertising fees by advertising and linking to amazon.com.